- Published on
Install Oh My Posh: Cross-Platform Prompt Glow-Up
- Authors

- Name
- Xiro The Dev
You stare at your terminal all day—might as well make it useful and beautiful. Oh My Posh is a fast, cross-platform prompt engine that decorates shells with context-aware segments (git status, kubectl context, Azure subscription, etc.) while staying portable. This tutorial walks you through installing it on the three big OS families, wiring it into popular shells, and keeping the configuration version-controlled.
TIP
Already have a prompt framework? You can still use Oh My Posh purely as a renderer by piping environment variables into custom segments.
Table of Contents
Why customize your prompt?
- Instant context – Show git status, background jobs, node version, or cloud profile without running extra commands.
- Consistency – Oh My Posh runs on Windows, macOS, and Linux, so your prompt looks and behaves the same everywhere.
- Productivity – Color cues reduce cognitive load; you notice an uncommitted change or the wrong Kubernetes namespace immediately.
- Playfulness – Let’s be honest, a glowing prompt makes shell time feel less like work.
Prerequisites
- Terminal that supports UTF-8 and ligatures (Windows Terminal, WezTerm, iTerm2, Kitty, Alacritty, etc.).
- Package manager access –
winget,brew,apt,dnf, orscoop. When all else fails, a plain binary download works too. - Profile write permission – Ability to edit
Microsoft.PowerShell_profile.ps1,.bashrc,.zshrc, orconfig.fish. - Nerd Font – Required for the glyphs that segments use. Install this before troubleshooting anything else.
Install the Nerd Font first
Oh My Posh themes rely on Nerd Fonts for icons. Pick one you like; Meslo and JetBrainsMono are safe defaults.
Windows
💡 Direct Microsoft Store install:
Prefer using Windows Terminal? Install JetBrainsMono Nerd Font straight from the Microsoft Store for easier setup and automatic updates.
winget install --id=ryanoasis.nerdfont.JetBrainsMono -e
# Select the font inside Windows Terminal → Settings → Defaults → Appearance.
macOS
brew tap homebrew/cask-fonts
brew install --cask font-meslo-lg-nerd-font
Linux (JetBrainsMono Nerd Font)
mkdir -p ~/.local/share/fonts
curl -L https://github.com/ryanoasis/nerd-fonts/releases/latest/download/JetBrainsMono.zip -o /tmp/jbm.zip
unzip -o /tmp/jbm.zip -d ~/.local/share/fonts
fc-cache -fv
Once the font is installed, set it in your terminal profile before moving on.
Install Oh My Posh
Windows (PowerShell, CMD, Windows Terminal)
winget
winget install JanDeDobbeleer.OhMyPosh --source winget
Manual
Set-ExecutionPolicy Bypass -Scope Process -Force; Invoke-Expression ((New-Object System.Net.WebClient).DownloadString('https://ohmyposh.dev/install.ps1'))
Chocolatey
choco install oh-my-posh
NOTE
The binary ends up in %LOCALAPPDATA%\Programs\oh-my-posh\oh-my-posh.exe. Add that directory to your PATH if your profile cannot find it automatically.
macOS (homebrew, MacPorts)
A Homebrew Formula and Cask are available for easy installation.
brew install jandedobbeleer/oh-my-posh/oh-my-posh
Updating is done via:
brew update && brew upgrade oh-my-posh
TIP
In case you see strange behaviour in your shell, reload it after upgrading Oh My Posh. For example in zsh:
brew update && brew upgrade && exec zsh
Linux distros
IMPORTANT
Before running the below commands, make sure that you have updated curl and the client certificate store on the target machine.
Install the latest version for your system by running the following command:
curl -s https://ohmyposh.dev/install.sh | bash -s
By default the script will install to ~/bin or ~/.local/bin depending on which one exists, or the existing Oh My Posh executable's installation folder. If you want to install to a different location you can specify it using the -d flag:
curl -s https://ohmyposh.dev/install.sh | bash -s -- -d ~/bin
Wire it into your shell
Pick every shell you use and add the initialization snippet.
PowerShell (5.x or 7+)
# Open your profile, create it if needed
if (!(Test-Path $PROFILE)) { New-Item -Type File -Path $PROFILE -Force }
notepad $PROFILE
Append:
oh-my-posh init pwsh --config "$env:POSH_THEMES_PATH\bubbles.omp.json" | Invoke-Expression
Replace bubbles with your theme of choice. Restart PowerShell or run . $PROFILE.
Windows CMD
oh-my-posh init cmd --config %POSH_THEMES_PATH%\powerlevel10k_classic.omp.json | call
Save the line inside %CMDER_ROOT%\config\user-profile.cmd or C:\Users\<you>\Documents\cmdrc.cmd if you use clink.
Bash
Add to ~/.bashrc:
eval "$(oh-my-posh init bash --config ~/.config/oh-my-posh/{theme}.omp.json)"
Zsh
eval "$(oh-my-posh init zsh --config ~/.config/oh-my-posh/{theme}.omp.json)"
Place that near the bottom of .zshrc, after plugin managers so that color exports are respected.
Fish
oh-my-posh init fish --config ~/.config/oh-my-posh/{theme}.omp.json | source
Store it in ~/.config/fish/config.fish.
Pick or craft a theme
Start by copying an existing theme to your config directory:
mkdir -p ~/.config/oh-my-posh
cp "$(oh-my-posh print-config --config minimal)" ~/.config/oh-my-posh/{theme}.omp.json
Preview all official themes:
oh-my-posh query theme list
oh-my-posh print-config --config <theme-name> | less
Sample JSON configuration i using
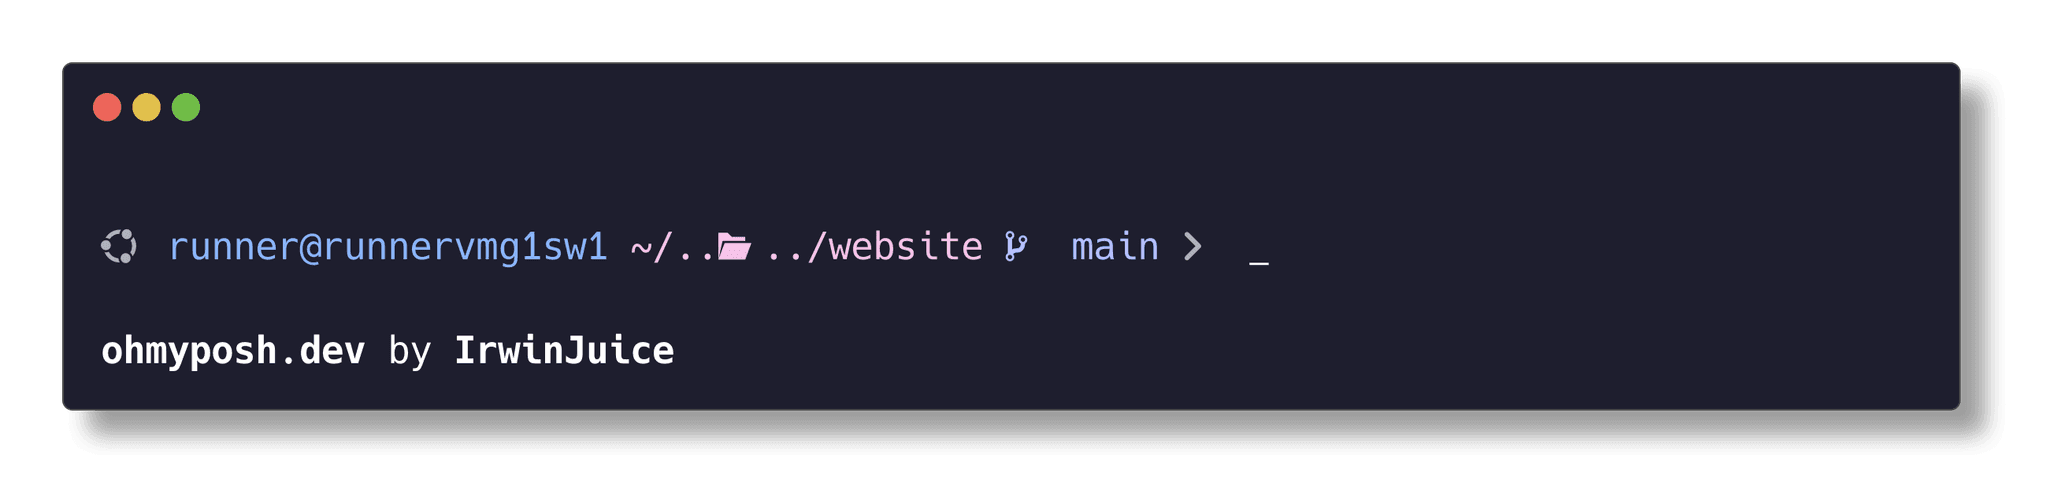
{
  "$schema": "https://raw.githubusercontent.com/JanDeDobbeleer/oh-my-posh/main/themes/schema.json",
  "palette": {
        "os": "#ACB0BE",
        "closer": "p:os",
        "pink": "#F5C2E7",
        "lavender": "#B4BEFE",
        "blue":  "#89B4FA"
  },
  "blocks": [
    {
      "alignment": "left",
      "segments": [
        {
          "foreground": "p:os",
          "style": "plain",
          "template": "{{.Icon}} ",
          "type": "os"
        },
        {
          "foreground": "p:blue",
          "style": "plain",
          "template": "{{ .UserName }}@{{ .HostName }} ",
          "type": "session"
        },
        {
          "foreground": "p:pink",
          "properties": {
            "folder_icon": "..\ue5fe..",
            "home_icon": "~",
            "style": "agnoster_short"
          },
          "style": "plain",
          "template": "{{ .Path }} ",
          "type": "path"
        },
        {
          "foreground": "p:lavender",
          "properties": {
            "branch_icon": "\ue725 ",
            "cherry_pick_icon": "\ue29b ",
            "commit_icon": "\uf417 ",
            "fetch_status": false,
            "fetch_upstream_icon": false,
            "merge_icon": "\ue727 ",
            "no_commits_icon": "\uf0c3 ",
            "rebase_icon": "\ue728 ",
            "revert_icon": "\uf0e2 ",
            "tag_icon": "\uf412 "
          },
          "template": "{{ .HEAD }} ",
          "style": "plain",
          "type": "git"
        },
        {
          "style": "plain",
          "foreground": "p:closer",
          "template": "\uf105",
          "type": "text"
        }
      ],
      "type": "prompt"
    }
  ],
  "final_space": true,
  "version": 3
}
Reload the shell to apply the changes. Every segment is documented at ohmyposh.dev/docs with its own properties—mix and match to only keep the data points that matter.
Test & troubleshoot
- Verify the binary –
oh-my-posh --versionshould return the installed version. - Check fonts – If icons show as squares, re-apply the Nerd Font in your terminal profile.
- Profile order – In Zsh, Oh My Posh must run after
compinitand plugin sourcing to avoid being overwritten. - Permissions – On Linux, ensure
~/.config/oh-my-posh/{theme}.omp.jsonis readable; on Windows, unblock scripts withUnblock-File. - Performance – Disable heavy segments (e.g., big git repos) or set
auto_disableto keep slow prompts snappy.
Keep the config sharable
- Track
~/.config/oh-my-posh/{theme}.omp.json(or its Windows equivalent) inside your dotfiles repo. - Point the
--configflag to a relative path in your dotfiles directory (e.g.,$env:POSH_CONFIG = "$HOME\.dotfiles\omp\main.omp.json"). - Sync across devices with Git, then run a bootstrap script that symlinks the config and installs the binary.
Wrap-up
With fonts, the binary, and shell hooks in place, your prompt becomes a dashboard: git status, cloud context, runtimes, and timing information are there the instant you hit <Enter>. Treat the JSON file like any other piece of code—review, version, and test it. When a teammate asks how your terminal looks that good, point them to this tutorial and let Oh My Posh do the talking.